Rate limit your APIs using go-redis
Adding a Redis rate limiter to a Go API
12 min read
Context
I was building a URL shortener with a Go backend and thought of adding API rate limiting using Redis. Here's what I learned while making it.
Trying Redis for Rate Limiting
At first I thought it would be simple. Store a counter in Redis and increment it by 1 every time the client sends a request to a particular route. Start a timer as soon as the first request is made and keep a fixed window, like 10 requests per minute. If ten requests are made within that minute, the client can't send any more until the minute is up.
In the process I got to know about two commands:
INCR: increments the count by 1.EXPIRE: sets a time-to-live (TTL) on a key, so it deletes itself after a given period.
But eventually I found out there's a lot more to take care of:
- The two commands aren't one step, so if one of them doesn't run, the rate limiter breaks. Suppose the server crashes between
INCRandEXPIRE: the key never expires and the user stays blocked forever. - Requests that arrive at the same time can slip through.
The usual fix for this is a Lua script, which Redis supports. But using Lua means learning another language, and I'm too lazy to learn one just to work with Redis.
Then I found redis_rate by go-redis, which handles all the Lua parts for you and gives you simple methods to call instead.
The Library
Install it:
go get github.com/go-redis/redis_rate/v10In this project I mainly used three types from it:
redis_rate.Limiter: the object that talks to Redis. You create it once withredis_rate.NewLimiter(rdb)and calllimiter.Allow(ctx, key, limit)on every request.redis_rate.Limit: the rule, meaning how many requests per what period. Helpers likeredis_rate.PerMinute(10)orredis_rate.PerHour(5)build it for you.redis_rate.Result: whatAllowreturns. It hasAllowed(0 means blocked),Remaining, andRetryAfter(how long to wait), which you'll use for the 429 response.
Setting Up Redis in Your Project
1. Run Redis with Docker
The easiest way to run Redis locally is Docker. Add this to your docker-compose.yml:
services:
  redis:
    image: redis:7.4-alpine
    restart: unless-stopped
    command: redis-server --requirepass yourpassword --appendonly yes
    ports:
      - "127.0.0.1:6379:6379"
    volumes:
      - redis_data:/data

volumes:
redis_data:--requirepasssets a password, so not just anyone can connect.--appendonly yessaves data to disk, so it survives a restart.127.0.0.1:6379:6379only exposes Redis on your own machine, not your whole network.
Make sure these flags go undercommand:, notenvironment:. Underenvironment:Redis silently ignores them and runs with no password. I made this mistake myself.
Start it:
docker compose up -d redisCheck that it's running:
docker compose exec redis redis-cli -a yourpassword ping
# PONG
2. Install go-redis
go get github.com/redis/go-redis/v93. Add the connection URL to your env
In your .env:
REDIS_URL=redis://:yourpassword@localhost:6379/0The format is redis://<user>:<password>@<host>:<port>/<db>. Redis has no username by default, so the part before : is empty. /0 is the database number. Redis has 16 (0–15), and 0 is the default.
4. Connect from Go
package cache

import (
	"context"
	"fmt"
	"time"

	"github.com/redis/go-redis/v9"
)

func ConnectCache(redisUrl string) (*redis.Client, error) {
	opts, err := redis.ParseURL(redisUrl)
	if err != nil {
		return nil, fmt.Errorf("redis.ParseURL: %w", err)
	}

	client := redis.NewClient(opts)

	ctx, cancel := context.WithTimeout(context.Background(), 5*time.Second)
	defer cancel()

	if err := client.Ping(ctx).Err(); err != nil {
		client.Close()
		return nil, fmt.Errorf("redis.Ping: %w", err)
	}

	return client, nil
}redis.ParseURLturns theREDIS_URLstring into connection options.redis.NewClientdoesn't actually connect yet. It connects lazily on the first command.- That's why we
Pingright away with a 5 second timeout. If Redis is down or the password is wrong, the app fails at startup instead of on the first user request.
Then in main.go:
client, err := cache.ConnectCache(cfg.RedisUrl)
if err != nil {
	logger.Error("cache connection failed", "err", err)
	os.Exit(1)
}
This client is what we'll pass to redis_rate.NewLimiter in the next section.
logger.Error()is optional. I'm usingslogfor logs.cfg.RedisUrlreadsREDIS_URLfrom.env. You can also callos.Getenv("REDIS_URL")directly.
The Regular Way
This is the version most tutorials stop at. It works perfectly on your laptop. Keep that in mind, because it comes back later.
The plan has three pieces:
1. ratelimit.go: a small wrapper around redis_rate that any route can reuse. 2. The middleware: runs before your handler and decides "allow" or "429". 3. Wiring: one line per route you want to protect.
ratelimit.go
package cache

import (
	"context"
	"fmt"

	"github.com/go-redis/redis_rate/v10"
	"github.com/redis/go-redis/v9"
)

type RateLimiter struct {
	limiter *redis_rate.Limiter
	limit   redis_rate.Limit
	name    string
}

func NewRateLimiter(client *redis.Client, limit redis_rate.Limit, name string) *RateLimiter {
	return &RateLimiter{
		limiter: redis_rate.NewLimiter(client),
		limit:   limit,
		name:    name,
	}
}

func rateLimitKey(name, id string) string {
	return "myapp:ratelimit:" + name + ":" + id
}

func (rl *RateLimiter) Allow(ctx context.Context, id string) (*redis_rate.Result, error) {
	res, err := rl.limiter.Allow(ctx, rateLimitKey(rl.name, id), rl.limit)
	if err != nil {
		return nil, fmt.Errorf("redis_rate.Allow: %w", err)
	}
	return res, nil
}
What each part does:
RateLimiterholds three things: theredis_ratelimiter, the rule (for example 5 per minute), and a name.Allowonly needs to know who is calling (id). The limiter already knows which route it belongs to and what the limit is.
The name matters. Without it, every route would share one Redis key per user, so 5 logins would also use up your 5 link shortens. With a name, each route gets its own counter:
myapp:ratelimit:login:ip:1.2.3.4
myapp:ratelimit:shorten:ip:1.2.3.4redis_rateadds its ownrate:prefix in front of every key, so in Redis you'll actually seerate:myapp:ratelimit:login:.... That prefix is hardcoded in the library and can't be changed. It's harmless.
The Middleware
package middleware

import (
	"log/slog"
	"math"
	"net"
	"net/http"
	"strconv"

	"github.com/you/myapp/internal/cache"
)

func RateLimit(rl *cache.RateLimiter, next http.HandlerFunc) http.HandlerFunc {
	return func(w http.ResponseWriter, r *http.Request) {
		res, err := rl.Allow(r.Context(), callerID(r))
		if err != nil {
			// fail open: if Redis is down, don't take the whole API down with it
			slog.Error("ratelimit: check failed, allowing", "err", err)
			next(w, r)
			return
		}

		w.Header().Set("X-RateLimit-Limit", strconv.Itoa(res.Limit.Rate))
		w.Header().Set("X-RateLimit-Remaining", strconv.Itoa(res.Remaining))

		if res.Allowed == 0 {
			w.Header().Set("Retry-After", strconv.Itoa(int(math.Ceil(res.RetryAfter.Seconds()))))
			http.Error(w, "Too many requests, slow down", http.StatusTooManyRequests)
			return
		}

		next(w, r)
	}
}

func callerID(r *http.Request) string {
	// logged-in users are counted by their user ID
	if uid, ok := UserID(r.Context()); ok {
		return "user:" + uid
	}

	// everyone else is counted by IP
	host, _, err := net.SplitHostPort(r.RemoteAddr)
	if err != nil {
		host = r.RemoteAddr
	}
	return "ip:" + host
}
Step by step:
1. Ask the limiter. rl.Allow is called with the caller's ID. 2. If Redis fails, let the request through. This is called failing open: a Redis outage shouldn't stop people from using your app. For a login route you might prefer failing closed and returning an error, since that's your brute-force protection. 3. Set the rate-limit headers, so clients can see how many requests they have left. 4. If Allowed == 0, return 429 Too Many Requests with a Retry-After header saying how many seconds to wait. The frontend can show "Try again in 12s" from this. 5. Otherwise, call the real handler.
Who is "the caller"?
That's what callerID decides:
- Logged-in users are counted by user ID, so they can't reset their limit by switching networks.
- Everyone else (guests, people on the login and register pages) is counted by IP.
r.RemoteAddrlooks like1.2.3.4:54321, andSplitHostPortkeeps only the IP. - Why not count guests by a cookie? Because they can clear cookies and get a fresh limit every time.
UserID(r.Context()) is whatever your auth middleware stores in the request context. If your app has no auth, drop that part and use the IP only.Wiring It Up
Create one limiter per route, each with its own name and rule:
shortenLimiter  := cache.NewRateLimiter(client, redis_rate.PerMinute(10), "shorten")
loginLimiter    := cache.NewRateLimiter(client, redis_rate.PerMinute(5), "login")
registerLimiter := cache.NewRateLimiter(client, redis_rate.PerHour(5), "register")
Then wrap the handlers:
mux.HandleFunc("POST /api/v1/auth/login",
	middleware.RateLimit(loginLimiter, a.LoginUser))

mux.HandleFunc("POST /api/v1/auth/register",
	middleware.RateLimit(registerLimiter, a.RegisterUser))

mux.HandleFunc("POST /api/v1/links/shorten",
	middleware.ResolveOwner(middleware.RateLimit(shortenLimiter, lh.ShortenLink)))
Order matters on the shorten route. ResolveOwner (my auth middleware) is on the outside, so it runs first and puts the user ID into the context. Then RateLimit can count that user by ID. Put them the other way round and every logged-in user gets counted by IP.
Why these numbers?
- Login, 5 per minute: enough for a few typos, too slow for guessing passwords.
- Register, 5 per hour: a real person signs up once. Not lower, because people on the same office or college network share one IP.
- Shorten, 10 per minute: plenty for a human, annoying for a spam bot.
If you have a separate frontend, the browser hides response headers from cross-origin requests by default. To let your frontend read Retry-After, expose it in your CORS middleware:
w.Header().Set("Access-Control-Expose-Headers", "Retry-After, X-RateLimit-Limit, X-RateLimit-Remaining")Testing It
Send 7 bad logins in a row:
Five wrong passwords, then blocked. It works.
Locally, at least. Then I deployed it.
The Problem: Different Devices, Different IPs, Same Rate Limit
After deploying the backend on Render, I tested the rate limiter again. It worked, but a bit too well LOL. When one device got rate limited, my other device got rate limited too, even though it was on a different network with a different IP.
Here's what that looked like:
Why does this happen?
Services like Render, Fly.io and Railway run a proxy in front of every app. The proxy opens its own connection to the API, so r.RemoteAddr is the proxy's IP, not the user's. My code wasn't wrong; it just couldn't see past the proxy.
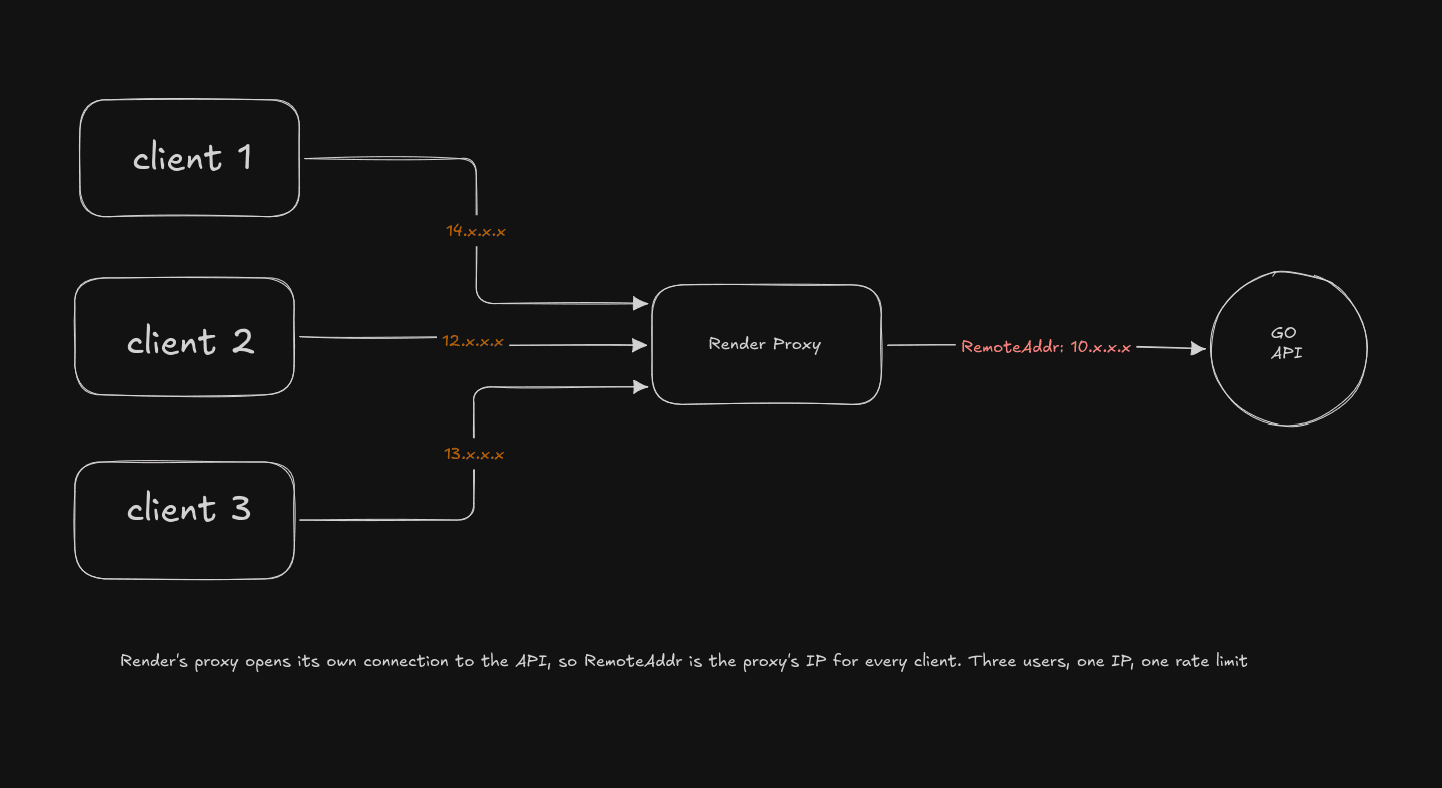
What Redis sees
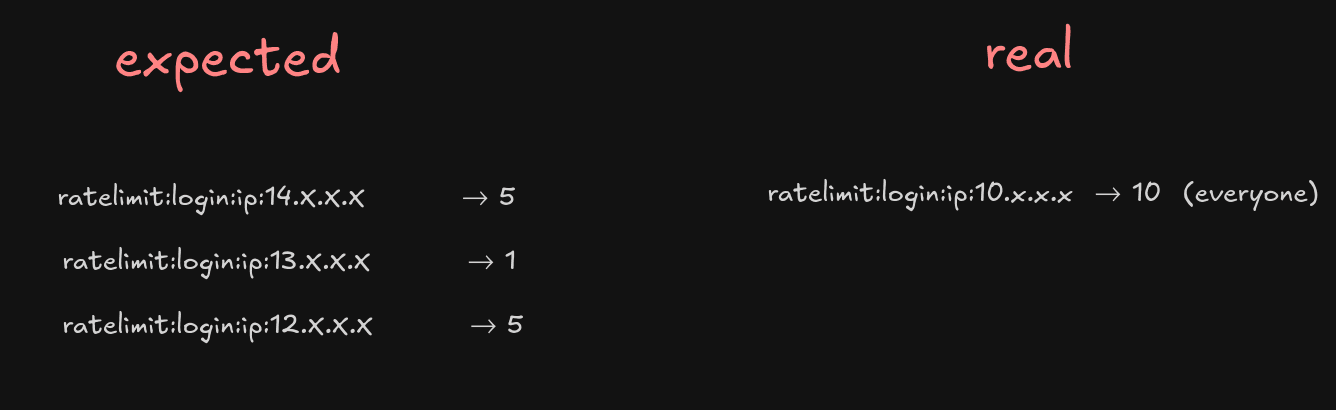
Every request lands on the same key, so one client hitting the limit blocks everyone. That's a pretty big problem.
The Solution
Finding the real IP
The proxy hides the user's IP from RemoteAddr, but it still passes it along. Before forwarding the request, it puts the real IP in a header:
RemoteAddr:      10.x.x.x          ← the proxy
True-Client-IP:  14.x.x.x          ← the real user
So the fix is to read the IP from that header instead of RemoteAddr.
Each platform uses a different header:
| Platform | Header |
|---|---|
| Render | True-Client-IP |
| Cloudflare | CF-Connecting-IP |
| Fly.io | Fly-Client-IP |
| Most others | X-Forwarded-For |
Why not X-Forwarded-For?
Most answers online say to read X-Forwarded-For and take the first IP. On Render that's a bad idea.
X-Forwarded-For is a list, and every proxy adds an IP to the end of it:
X-Forwarded-For: <client>, <proxy1>, <proxy2>The problem is that the client can send this header too. According to a thread on Render's feedback board, Render adds to it instead of replacing it. If that's the case, anyone could do this:
curl -H "X-Forwarded-For: 1.1.1.1" https://my-api.onrender.com/api/v1/auth/login ...and the API would receive:
X-Forwarded-For: 1.1.1.1, <attacker's real IP>
                 ▲ fake, written by the attacker
If I took the first IP, an attacker could send a different fake IP with every request and never hit the limit. That's even worse than the bug I started with.
True-Client-IP holds just one IP, and from what I've read, Render's proxy sets it itself, so a client shouldn't be able to fake it. I haven't confirmed that myself yet, so the testing section below includes a quick check you can run. In general, only trust a header your proxy sets, not one it just passes along.
The code
I moved the IP logic into its own file, clientip.go:
package middleware

import (
	"net"
	"net/http"
	"strings"
)

// ClientIPHeader is the header the hosting proxy puts the real client IP in
// (e.g. "True-Client-IP" on Render). Empty means no proxy: use RemoteAddr.
var ClientIPHeader string

// ClientIP returns the IP of the caller, not of the proxy in front of the API.
func ClientIP(r *http.Request) string {
	if ClientIPHeader != "" {
		if ip := net.ParseIP(strings.TrimSpace(r.Header.Get(ClientIPHeader))); ip != nil {
			return ip.String()
		}
	}

	host, _, err := net.SplitHostPort(r.RemoteAddr)
	if err != nil {
		return r.RemoteAddr
	}
	return host
}
If a header name is set, it reads the IP from that header. net.ParseIP makes sure it's an actual IP, so a missing header or junk like "hello" gets skipped. ip.String() formats it the same way every time, so the same user always gets the same Redis key. If there's no header, it falls back to RemoteAddr, which is the old behaviour and is fine when there's no proxy, like on your laptop.
Then callerID just calls it:
func callerID(r *http.Request) string {
	if uid, ok := UserID(r.Context()); ok {
		return "user:" + uid
	}
	return "ip:" + ClientIP(r) // was: net.SplitHostPort(r.RemoteAddr)
}
That's the only change in the middleware.
Making the header configurable
I didn't hardcode "True-Client-IP". I read it from an environment variable instead:
// config
ClientIPHeader: os.Getenv("CLIENT_IP_HEADER"),

// main.go
middleware.ClientIPHeader = cfg.ClientIPHeader
Locally there's no proxy, so if the code always trusted the header, anyone could send True-Client-IP: <anything> to your local server and pick their own IP. With the variable unset, the header is ignored. It also means I can switch headers from the Render dashboard, or move to Fly.io and set it to Fly-Client-IP, without changing any code.
On Render, go to your service's Environment tab and add:
CLIENT_IP_HEADER=True-Client-IPTesting the fix
I added the client IP to my request logs, next to RemoteAddr:
"remote_addr", r.RemoteAddr,
"client_ip",   ClientIP(r),
First, check that it sees the real IP:
curl -s https://my-api.onrender.com/api/v1/healthzIn the Render logs, remote_addr should still be the proxy (10.x.x.x) and client_ip should be your own IP. You can check yours on ifconfig.me.
Then check that it can't be faked. Do this before you rely on the header:
curl -s -H "True-Client-IP: 1.1.1.1" https://my-api.onrender.com/api/v1/healthzIf the log shows your real IP, the proxy overwrote the fake header and you're fine. If it shows 1.1.1.1, anyone can fake their IP, so don't use that header.
Finally, the original bug. I ran the curl loop on my laptop until I got a 429, switched to my phone's hotspot, and tried again:
401 ← different network, its own rate limitEach user has their own counter again.
Wrapping Up
A few things I'd tell myself before starting:
INCRandEXPIRElook like enough, but they break if the server crashes between them.redis_ratehandles that for you with Lua, and its algorithm (GCRA) also stops bursts at the edges of a window.- Give each limiter a name so different routes don't share one counter.
r.RemoteAddris whoever opened the connection, which in production is usually a proxy and not the user.- Don't trust
X-Forwarded-Forblindly. Use the header your platform sets, and check that it can't be faked.
What's next
It's still not perfect:
- If Redis goes down, every request gets through. That's fine for shortening links, but it means login has no brute-force protection during the outage.
- If I put something else in front of the API later, like a Cloudflare Worker, that's another proxy and this problem could come back.
If you're adding a rate limiter to your own project, test it after you deploy, from two different networks. That's how I found this bug.